By ATGL
Updated December 25, 2025
In technical analysis, few price events grab a trader’s attention as quickly as a gap on the chart. When a stock opens significantly above or below the prior day’s range, it immediately signals urgency—buyers or sellers are willing to transact at very different prices than before. Among all gap types, breakaway gaps stand out as some of the most powerful signals a trader can observe.
Breakaway gaps matter because they often mark the birth of a new trend. They frequently appear after extended periods of consolidation, indecision, or well-defined chart patterns. When price suddenly “breaks away” from that structure, it suggests that a new consensus has formed—often driven by fresh information, changing expectations, or a decisive shift in supply and demand.
In this article, we’ll explore what breakaway gaps are, how to identify them on a chart, the difference between bullish and bearish versions, and how traders can build structured strategies around them. We’ll also cover common mistakes, explain how breakaway gaps help identify major trend shifts, and clarify how they differ from other gap types. By the end, you’ll have a clear framework for recognizing and using breakaway gaps as part of a disciplined trading approach.
What Is a Breakaway Gap?
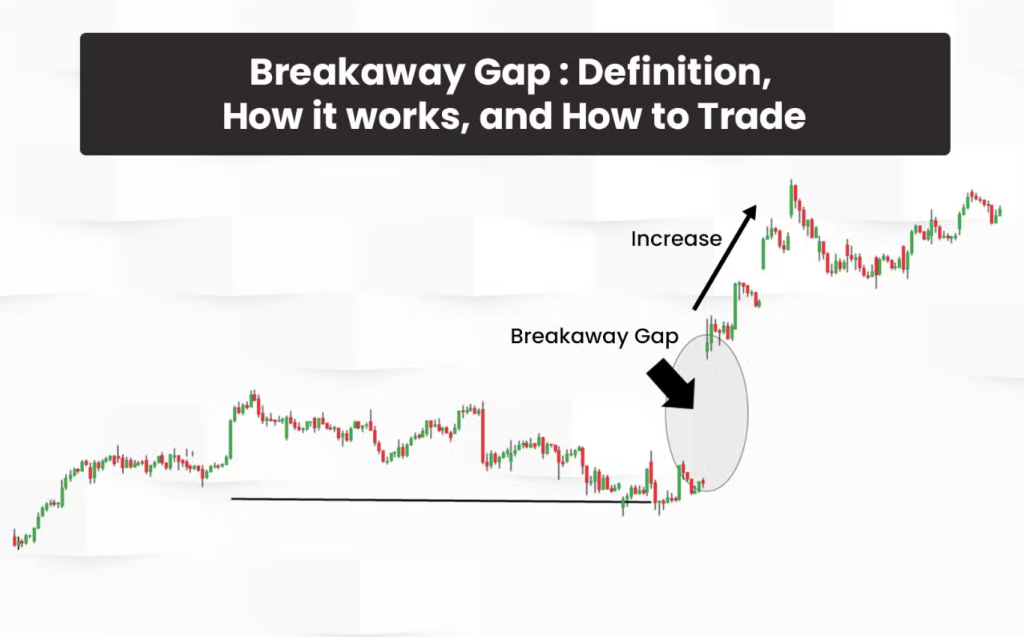
A breakaway gap occurs when price jumps decisively away from a clearly defined trading range or chart pattern, leaving little or no overlap with prior price action. In plain language, it’s the market saying, “We are done trading here—price has discovered a new level.”
What distinguishes a breakaway gap from more common gaps is context. Many gaps occur randomly or during thin trading conditions, but a breakaway gap almost always appears at a critical technical juncture. It often marks the end of consolidation phases such as rectangles, triangles, or basing patterns, where price has spent time coiling and building energy.
Breakaway gaps are frequently triggered by catalysts. These may include earnings announcements, regulatory decisions, macroeconomic news, mergers, or broad market regime changes. Whatever the cause, the result is the same: price exits the prior structure with force.
One of the defining characteristics of a strong breakaway gap is follow-through. Rather than being quickly faded, price often continues in the direction of the gap for days, weeks, or even months. This follow-through is what makes breakaway gaps so valuable to swing traders and trend followers alike.
How to Identify a Breakaway Gap on the Chart
Identifying a true breakaway gap requires more than spotting an empty space between candles. Traders must evaluate the surrounding conditions to determine whether the gap represents meaningful information or just noise.
Volume Confirmation
Volume is one of the most important validating factors for breakaway gaps. A genuine breakaway gap is typically accompanied by above-average volume, signaling strong participation from institutions and large market players. High volume confirms that the gap is not the result of illiquidity or overnight anomalies but reflects real conviction.
Without volume confirmation, a gap is far more likely to be filled quickly. Traders who incorporate disciplined volume analysis into their chart reading gain a significant edge in separating high-probability breakaway gaps from weaker setups.
Pattern Location & Triggers
Location is everything. Breakaway gaps are most meaningful when they occur as price exits a well-defined pattern. Examples include:
- A gap above the top of a rectangle or consolidation range
- A gap out of a triangle after weeks of compression
- A gap below the neckline of a head-and-shoulders pattern
Common triggers include earnings releases, major news headlines, sector rotations, or shifts in overall market sentiment. When these catalysts align with technical pressure that has been building, the resulting gap often marks a decisive turning point.
Do breakaway gaps get filled?
While no market behavior is absolute, breakaway gaps are less likely to be filled quickly compared to other gap types. Because they represent a repricing of the asset, price often treats the gap area as support (in bullish gaps) or resistance (in bearish gaps) for extended periods.
Bullish vs. Bearish Breakaway Gaps
Breakaway gaps can occur in either direction, and understanding the distinction is critical for aligning trades with the dominant trend.
Bullish Breakaway Gaps
A bullish breakaway gap occurs when price gaps upward above a resistance zone, consolidation range, or chart pattern. Visually, the stock opens above the prior day’s highs, leaving a clear gap on the chart.
This type of gap suggests that buyers have overwhelmed sellers and are willing to pay significantly higher prices to gain exposure. Bullish breakaway gaps often initiate sustained uptrends, especially when supported by strong volume and favorable market conditions.
Bearish Breakaway Gaps
A bearish breakaway gap occurs when price gaps downward below a support level or established pattern. The stock opens sharply lower, indicating aggressive selling pressure.
Bearish breakaway gaps often signal the start of downtrends or major corrections. They reflect a breakdown in confidence and can lead to prolonged declines if selling pressure persists.
In both cases, the key takeaway is that the gap itself is less important than where it occurs and how the market responds afterward.
Breakaway Gap Trading Strategy: Entry & Exit Rules
Recognizing a breakaway gap is only the first step. To trade them effectively, traders need a structured strategy that defines entries, exits, and risk parameters.
One common entry approach is the breakout close. Instead of chasing the opening gap, traders wait for the session to close and confirm that price has held above (for bullish gaps) or below (for bearish gaps) the gap level. This helps avoid false breakouts driven by emotional reactions.
Another approach involves entering on a shallow pullback toward the gap area. In strong breakaway moves, price may briefly retrace toward the gap without filling it, offering a more favorable risk-to-reward entry.
A third method uses confirmation above or below gap levels, such as entering once price makes a new high above a bullish gap day or a new low below a bearish gap day.
Stops are typically placed:
- Below the low of the gap day for long positions
- Above the high of the gap day for short positions
This placement aligns risk with the technical thesis: if price reverses back into the prior range, the breakaway premise is invalidated.
Equally important is position sizing. Breakaway gaps can be volatile, and without proper sizing, emotional decisions can creep in. Incorporating sound risk management principles ensures that no single gap trade can significantly damage overall performance.
Common Mistakes to Avoid in Breakaway Gap Trading
One of the most common mistakes traders make is trading gaps in low-volume environments. Gaps that occur during thin liquidity—such as holiday sessions or pre-market noise—often lack follow-through.
Another frequent error is ignoring the broader trend context. A bullish gap against a strong downtrend or a bearish gap in a powerful uptrend has lower odds of success. Breakaway gaps work best when they align with—or clearly redefine—the prevailing trend.
Traders also fall into the trap of chasing price emotionally. Jumping in late after an extended move increases risk and reduces reward. Structured entries and predefined stops help counteract this tendency.
Finally, confusing breakaway gaps with other gap types leads to misinterpretation. Not every gap signals a new trend, and treating all gaps the same is a recipe for inconsistency.
How Breakaway Gaps Help Spot Trend Shifts
Breakaway gaps are especially valuable because they often appear early in major trend shifts. While indicators may lag, a breakaway gap reflects immediate changes in market expectations.
By breaking out of long-standing ranges, these gaps signal that accumulation or distribution phases have ended. Traders who recognize this transition can align themselves with emerging trends rather than reacting late.
It’s also important to distinguish breakaway gaps from exhaustion gaps. A breakaway gap occurs near the beginning of a move, while an exhaustion gap typically appears near the end, signaling that a trend may be running out of steam. Understanding this difference helps traders avoid buying tops or selling bottoms. For more insight into late-stage moves, exploring concepts like market exhaustion can add valuable context.
Take Action With Informed Trading
Breakaway gaps are more than dramatic price events—they are windows into shifting market psychology. When identified correctly and traded with discipline, they can provide early entry into powerful trends and help traders stay aligned with institutional flows.
The key is context, confirmation, and consistency. By combining chart structure, volume, and sound risk controls, breakaway gaps can become a reliable component of a rules-based trading approach.
If you’re serious about improving your gap analysis, deepen your understanding of volume analysis, strengthen your risk management framework, and study how breakaway gaps interact with broader trend structures. With practice and discipline, these powerful signals can help you trade with greater confidence and clarity.
Inside Above the Green Line (ATGL) Membership, traders gain access to rules-based tools, volume-confirmed setups, and proven risk controls designed to identify high-probability breakaway gaps early—so you can trade emerging trends with confidence instead of reacting after the move is already underway.

Related Articles

Penny Stocks: How to Identify High-Probability Setups Using Rules-Based Investing
Margin Call Explained: What Triggers It and How to Avoid One

AMC Short Squeeze Explained: Timeline, Causes, and Trading Risks

Volatility Clustering in Financial Markets: Understand Why It Happens